Our Epic RV Trip: Visiting Several Western US National Parks
/
DISCLAIMER: This is not a trip that I help plan for others. I’m posting this strictly as a resource for others planning the same type of adventure.
Last summer, after about a year of planning, our family did what we’ve been talking about doing for several years… we rented an RV and spent 2 weeks touring many places in the western US! We drove through 11 states, over 5000 miles, visited 14 major destinations, including 7 national parks and made endless memories! This isn’t a trip that I typically help plan for my clients, however, it’s one that I know many people have thought about doing and are curious about where we went and how much it cost. With so many people choosing to travel domestically this summer, I thought it might be helpful information.
A little backstory, we are a family of 5… my husband, myself, and 3 kids ages 16, 13 and 8 at the time we traveled. We live just outside of St. Louis and love to experience new places as a family. Several years ago we began discussing the idea of renting an RV for a couple of weeks and hitting up as many national parks in the western US that we could. We knew that we wanted to plan it for a time when our kids would hopefully remember the trip and be able to easily adjust to life on the road. We tend to loosely plan out our vacations a couple of years in advance (it is my job after all) and the summer of 2019 looked like the perfect time to do it!
About a year before our trip, we bought a US map and started mapping out different areas that we considered “must sees” for this trip. I did lots of Pinterest & Google searches to look at itineraries from other people who had taken similar trips and get ideas of places we wanted to see. Once we had a pretty good idea of where we wanted to go, I found a website called Roadtrippers (www.roadtrippers.com) where I was able to enter all the destinations we were interested in and map everything out (I used the free version of the site). This was so helpful because it gave me a better idea of where everything was located and how long it would take to get to each place. We were then able to come up with a loose plan and remove or add places until we were happy with it.
Then we knew we needed to finalize a few details. First we had to decide what dates would work for us. I knew I wanted to try to go as soon as our kids got out of school in late May so that we would beat the summer crowds and heat. We also knew we had about 2 weeks to work with, so from there we decided that we would plan Saturday, May 25th thru Sunday, June 9th.
The next step was to research different campgrounds. Campgrounds inside of or near national parks can book up anywhere from 6 months to a year in advance, so this needed to be done as soon as possible. We were able to book most online and left a few nights open when we had longer drives since we didn’t know where we would want to stop to sleep. When booking a campground, you have to double check to see if they have spaces for RVs your size, as some do not allow the larger ones.
Next, we checked into several companies that rented RVs. We compared sizes, prices, availability, inclusions and reviews of many different companies. Eventually we decided that we wanted each of our kids to have their own beds and space to separate, since they are older, so we went with a 30 foot Class C Motorhome. Because our mapped out trip basically made a big U-shape, we also decided that we could cut out a lot of expense if we drove our own car to a middle point where we would rent the RV from. The middle point for us that had a variety of rental companies to choose from was near Denver, Colorado. We ended up renting our RV thru Road Bear RV in Commerce City, CO (and were very happy with them). One way rentals are typically more expensive and since we were leaving our personal car there, we needed to pick up & drop off the RV at the same location.
Once we had that settled, I began doing more research on each place we wanted to visit. I began taking notes on what hikes we might like, what places we wanted to see within each park, etc and coming up with a more detailed itinerary. Doing this allows you to see as much as possible without wasting time deciding what you want to do once you get there. This was important since we didn’t have a ton of time at each place.
Next, it was time to countdown to our trip and do any last minute preparations. We purchased new water bottles and holders for them, waterproof hiking shoes, an annual National Park Pass ($85 for the whole family) and National Park Passport books to collect stamps along the way.
Then, on Friday afternoon, May 24th, our kids last day of school, we packed everything up and began the drive from St. Louis to Colorado. We stopped in Salina, Kansas and stayed the night in a hotel before driving the rest of the way to pick up the RV.
Day 1: GARDEN OF THE GODS, Colorado City, CO.
Our first day was mainly spent driving to pick up the RV, getting everything into the RV and stopping at WalMart to pick up groceries. We didn’t want to go too far on the first few days while my husband was getting used to driving it, so we planned to go to Colorado City to check out Garden of the Gods, about 1-1/2 hours away. Driving a 30 foot long motorhome was definitely a challenge for my husband, mainly because of the wind & curvy, bumpy roads. I was very glad that we didn’t drive very far the first several days, because it was definitely not easy to get used to. (Side note- you do not need a special drivers licence to rent this particular RV, just a regular one will do).

Once we arrived at Garden of the Gods park we stopped at the visitor’s center, stamped our passport books and asked a little bit about where we could drive and what we could do in a short amount of time. We ended up driving along the Juniper Way Loop, and made a few stops for pictures along the way. We wanted to get to our campground before the sunset, so we didn’t spend a whole lot of time at the park. We reserved a campsite at the Pueblo KOA Campground in Pueblo, CO, about 45 minutes away. It was easy to get to and right off the highway. We were thrilled that they offered pizza and other snacks there so we didn’t have to worry about hooking up the RV for the first time, getting settled and cooking dinner. The kids played for awhile at the playground and basketball court before getting ready for bed.
Admission to Garden of the Gods: Free
Cost of Campground Reservation: $65.08 for 1 night in a pull-thru with full hookups.
Day 2: GREAT SAND DUNES NATIONAL PARK, near Alamosa, CO.
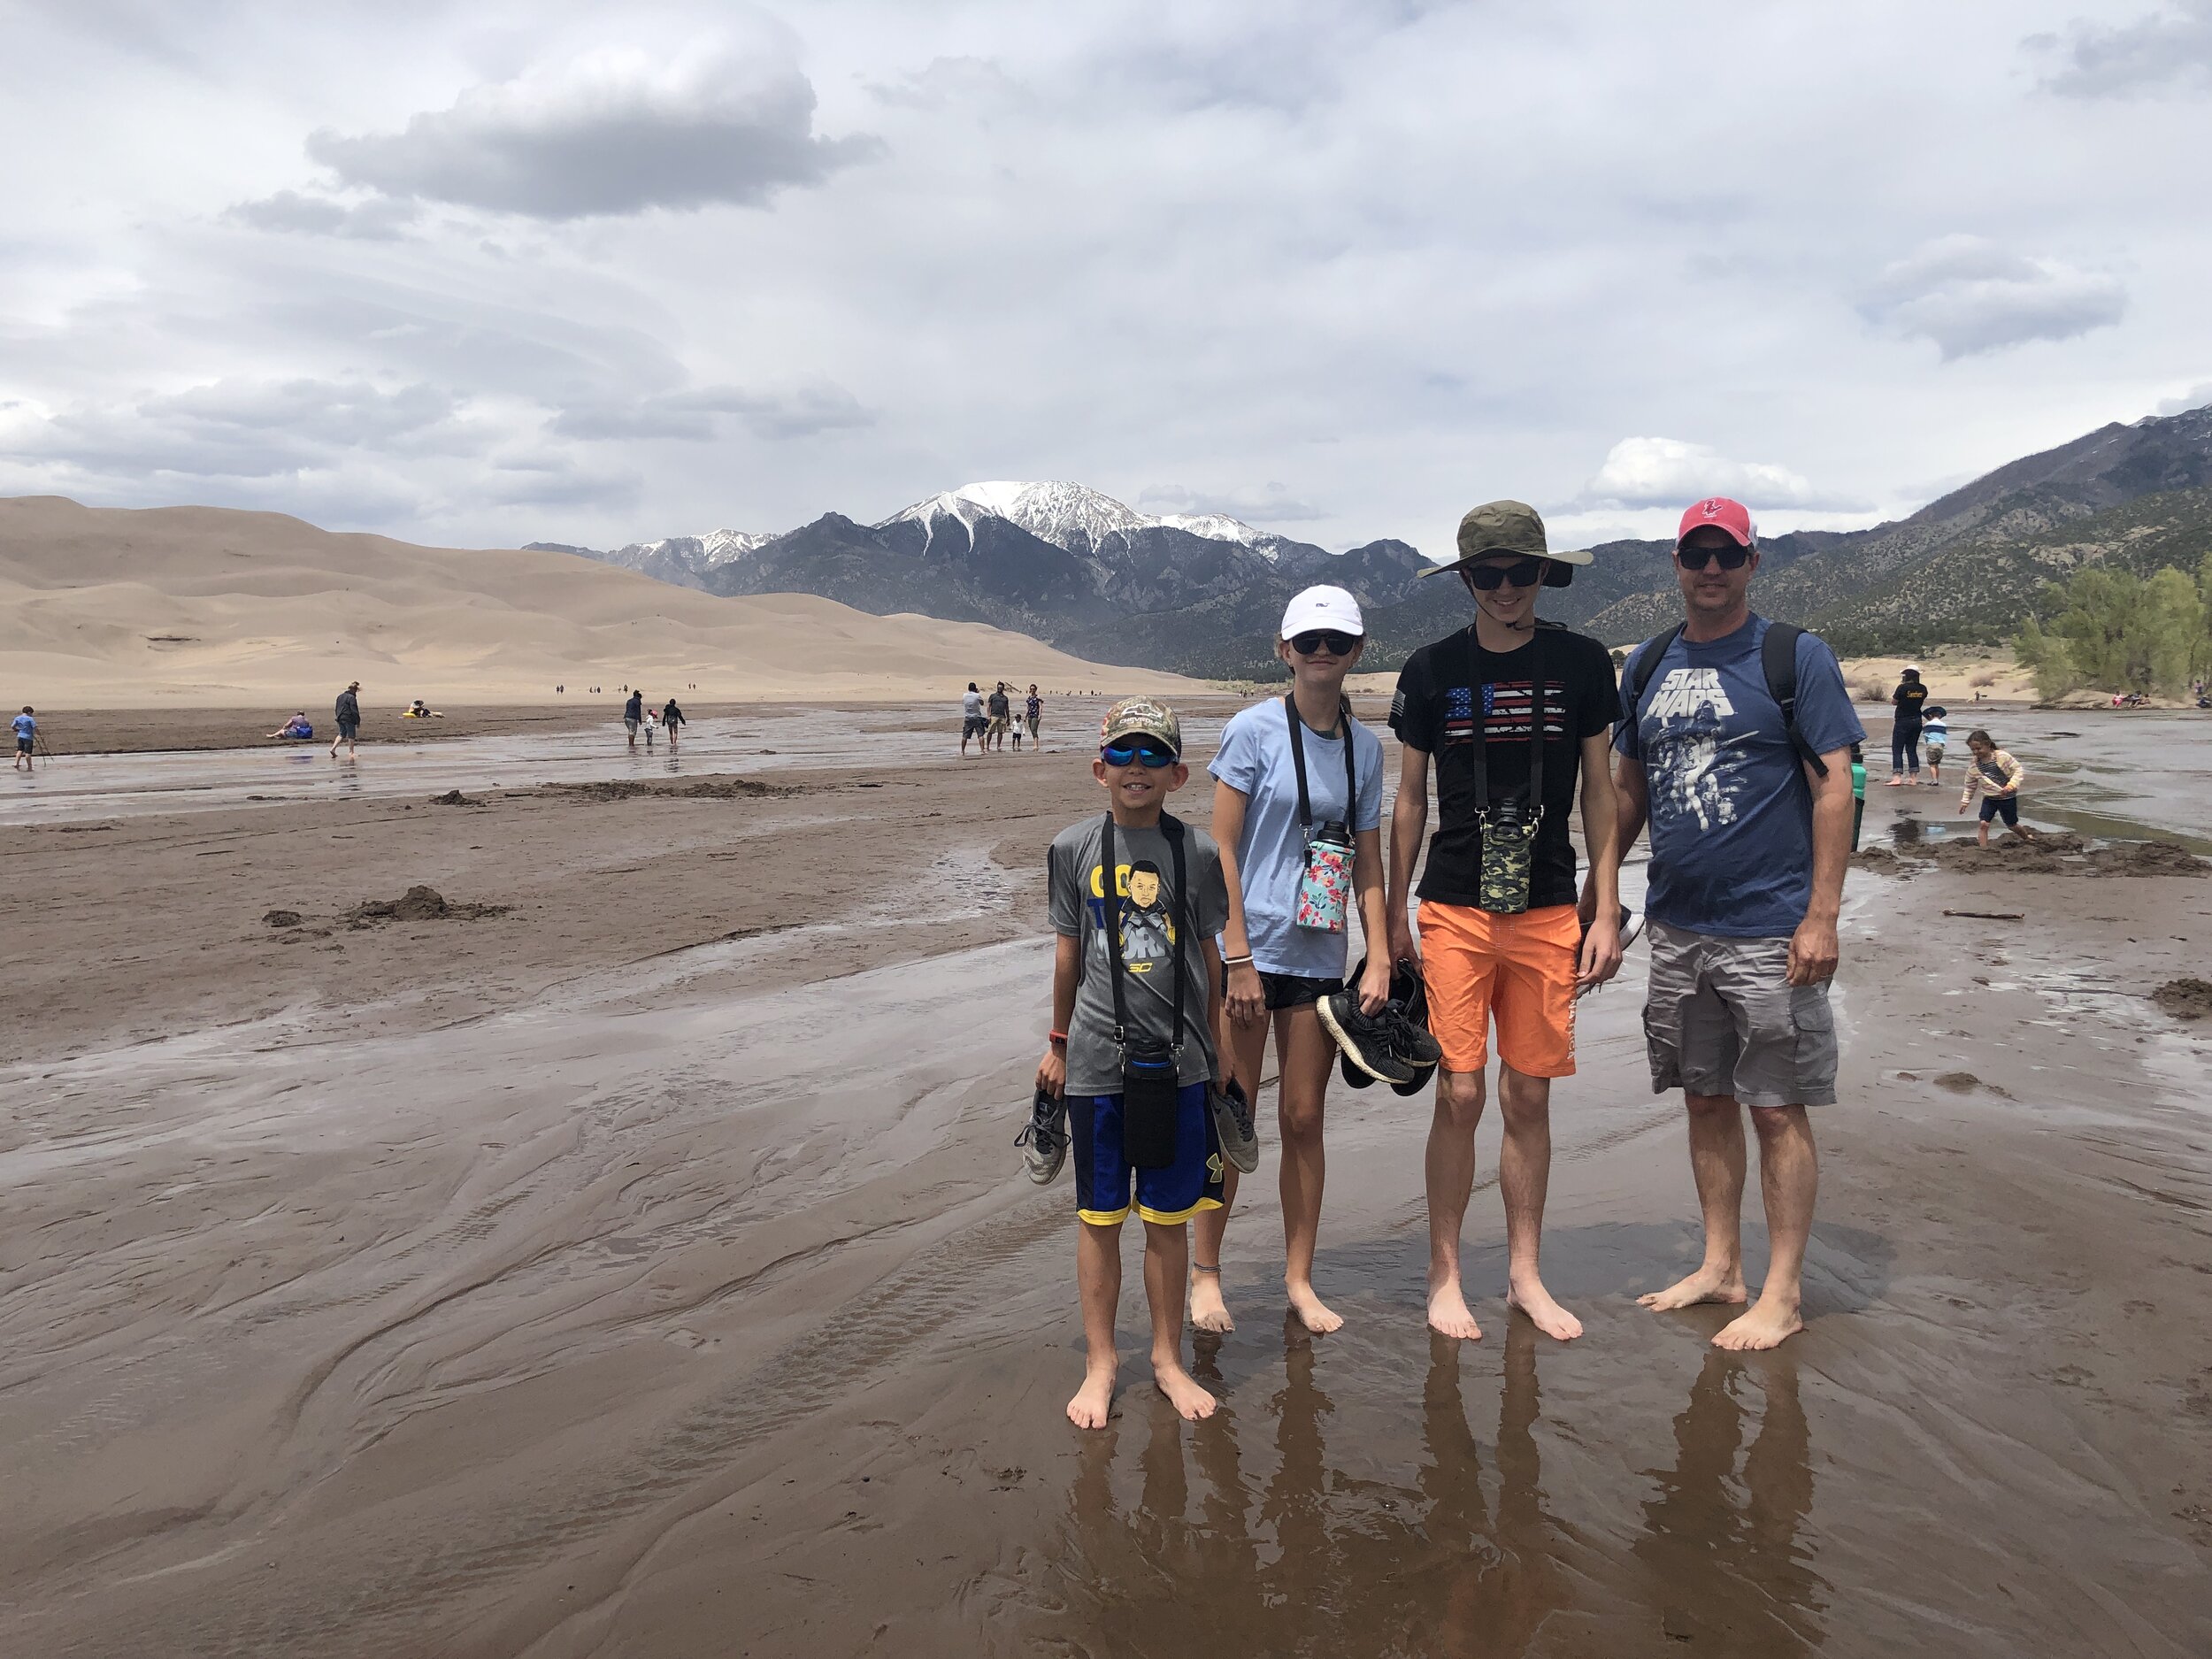
On our next day, we drove 2-1/2 hours to Great Sand Dunes National Park. We had to wait in line about an hour to get into the parking lot, but it didn’t bother us because we had a bathroom available and were able to make lunch while we waited. It was a cloudy, windy day while we were there and only around 70 degrees. We walked thru Medano Creek and up into the sand dunes, but our youngest didn’t like having sand blown all over him and requested to go back to the RV. The older 2 kids hiked quite a ways up the dunes and had fun playing in the sand, despite how windy it was. It was definitely amazing to see, but I wish it would have been warmer and less windy. On our way out, we stopped at the visitor’s center, stamped our passport books and looked around a bit before driving about 2-1/2 hours to our next campground. Our route to the campground took us thru the San Juan mountains, where it was snowing! That was nerve-wracking in the mega RV. My husband was definitely white knuckling it the whole way! We finally arrived at the Pagosa Pines RV Park in Pagosa Springs, CO just before dark. We made dinner and played cards before heading to sleep.
Admission to Great Sand Dunes NP: Free with our National Park pass.
Cost of Campground Reservation: $58.64 for 1 night in a back-in spot with full hookups.

Day 3: 4 CORNERS MONUMENT + MONUMENT VALLEY, Utah/Arizona border

Day 3 started with our youngest waking up with a stomach bug which lasted most of the day. I was really thankful that we were in an RV because he was able to lie down, sleep, get up to use the bathroom, etc while we drove to our next stop. Unfortunately, he didn’t leave the RV at all that day, so he missed seeing a few things, but we still drove to the 4 Corners Monument, about 2-1/2 hours from our campground. It was SO windy the closer we got. We were very nervous the whole way & ended up staying in the parking lot for awhile to see if the wind would die down some. Once we arrived, I stayed in the RV with our sick kiddo, while my husband and other 2 kids stood in the 4 corners and took photos (I had visited the monument when I was younger, so I didn’t mind missing out). After awhile, we left and headed to Monument Valley, about 2 hours away. It stayed pretty windy that whole day, but we were able to see the Mexican Hat and stop at “Forrest Gump Point” along the way. They do offer tours up and around Monument Valley, but we felt like we really just wanted to be able to see the infamous landscape, which we were able to do very well from the road. That night we stayed at Gouldings RV Campground, near Monument Valley. We really liked it there. You could see the infamous rock formations from the campground and they had an indoor pool and laundry mat, which we took advantage of.
Cost for entrance to the 4 Corners Monument: $5 for parking.
Cost of Campground Reservation: $69.88 for 1 night in a back-in, full hookup site.
Day 4: HORSESHOE BEND + ANTELOPE CANYON, Page, AZ

On Day 4, we drove a couple of hours toward Horseshoe Bend. We had to park down the road from Horseshoe Bend and take a shuttle there. It was about a mile easy hike before seeing the landmark. It was amazing! So many of the places we visited were things we had only seen on TV or screensavers, so to see them in person was really neat. There were several places to take pictures.
Our next stop was a little bit of hiking and photos around the Glen Canyon Dam. We found an overlook area and it was beautiful! Great place for a quick stop.

We had made a reservation in advance to take a tour of nearby Lower Antelope Canyon. Our reservation was for a one hour tour at 4:15 with Dixie Ellis Tours. This was a “Must Do”! We were able to climb down into the canyon and hike with a tour guide who was kind enough to take tons of pictures of us with my phone. Just a note, make sure that you research what time it is here when you visit. The tour company operates on Arizona Mountain Standard Time so you don’t want to arrive too early or late!
After our tour we drove about 30 minutes to Wahweap Campground at Lake Powell. This was a beautiful campground right on the lake. We loved walking around the campground area.
Antelope Canyon Tour: $227.06 for all 5 of us.
Cost for Campsite Rental: $58.15 for 1 night in a back-in site with full hookups.
Day 5: GRAND CANYON NATIONAL PARK, South Rim

The next morning we drove 2-1/2 hours to Grand Canyon National Park. We checked in at the Mather’s Campground inside the park before going to the visitor’s center, stamping our passports and getting a map. We hiked the Rim Trail for a few miles (an easy hike along the top rim) before hiking about a mile on the Bright Angel trail. Our youngest 2 kids also completed the Junior Ranger program here as well. We took the shuttle around for a bit before going back to the campground.
Grand Canyon NP Entrance fee: Free with our pass.
Cost for Campsite Reservation: $18 for 1 night pull-thru with no hookups.

Day 6: ZION NATIONAL PARK, Southwest Utah

The next morning we spent a bit more time at the Grand Canyon visitor’s center before beginning our 4-1/2 hour drive to Zion National Park. We were in awe of how beautiful this entire park was! It looked like a painting everywhere you looked. Our first stop was the visitor’s center where we stamped our passports, got a map and talked to a park ranger about which hikes we should do. This park uses a shuttle system, so we were able to leave the RV at the visitor’s center and shuttle to the entrance of whatever hike we wanted to do. We did the Lower Emerald Pool Trail and the Weeping Rock Trail which were perfect for us. When driving thru the park with a large RV, you do have to pay to be escorted thru a very narrow Zion-Mount Carmel Highway Tunnel. The cost is only $15, good for 2 trips thru. They stop traffic in each direction and escort you through.
This evening we stayed just outside the park at the Zion Canyon Campground, which had beautiful views of some of the rock formations and a river nearby.
Admission to Zion NP: Free with our pass.
Zion Tunnel escort: $15
Cost for Campsite Reservation: $61.14 for 1 night in a pull-thru spot with hookups.
Day 7: ZION NATIONAL PARK + A DAY OF DRIVING, Utah + Wyoming
We knew that this would be a long day of driving, as we were making the trek to Wyoming. We decided to hike a bit this morning before being stuck in the RV for many hours. We hiked a couple of miles on the Watchman Trail before getting on the road. From Zion, it was about a 10 hour drive to our campground at the Grand Tetons. We had no campsite reserved this night since we weren’t sure exactly how far we would get before we needed to stop. We made it all the way to Afton, Wyoming at dusk and found a newer campground (the Kodiak Mountain Resort) there to stay at for the night.
Entrance back into Zion NP: Free with our pass.
Cost for Campsite Reservation: $52.92 for 1 night in a pull-thru with full hookups.
Days 8 & 9: GRAND TETONS NATIONAL PARK, Jackson Hole, WY


The campground we wanted to try to stay at in Grand Tetons (Gros Ventre) is first come, first served so we knew we wanted to try to get there before noon. It was about 1-1/2 hours from our campground that we had stopped at. We arrived at the campground and were able to get a spot easily for 2 nights. We then drove around for awhile, stopping at different pull-offs to take pictures before doing the Leigh Lake hike (easy hike that is 1.8 miles round trip). The next morning we got up early to go to Jenny Lake and take the boat shuttle to do some hiking. We hiked to Hidden Falls and Inspiration Point, which were both moderate hikes, but easy enough that my kids didn’t complain. The views were beautiful. I highly recommend the boat ride and hikes. We then stopped for yummy pizza at Leeks Marina, past Colter Bay and spent the rest of the day driving around and stopping at various areas along the way. We really enjoyed watching all of the bison, elk & beavers we saw. Later that afternoon we decided to drive into the town of Jackson Hole to check it out. It was such a cute, quaint town with lots of touristy shops and restaurants.
Entrance to Grand Tetons NP: Free with our pass.
Jenny Lake Boat Shuttle: $50 for the 5 of us, plus tip.
Cost for Campsite Reservation: $110 for 2 nights in a pull-thru, electric hookup site.
Days 10 & 11: YELLOWSTONE NATIONAL PARK, Northwest Wyoming


The next day we packed up & headed toward Yellowstone National Park, which even though it seems close to Grand Tetons, it takes about 2 hours to get inside the park from where we were camping. We went in through the snow covered southern entrance and had to wait awhile to get into the park. Once inside, we stopped at a few waterfalls and then at the Grant Village visitor’s center to get maps and stamp our passport books. Our next stop was Old Faithful. Unfortunately for us, the weather turned cold & rainy so waiting for it to erupt seemed to take forever, however it was pretty neat to witness.We then went to the Grand Prismatic Spring. Parking was hard to find, but we ended up parking along the road near the trail that leads you up to the terrace where you can look down onto the spring. It was still cold and rainy, but this view was amazing! By this time, we were near the west entrance, which was where our campground was located, so we decided to go check in. Campgrounds inside of Yellowstone book up close to a year in advance, so we stayed at Yellowstone Grizzly RV Park for 2 nights. The location was great, but we didn’t really care for the campground much. It was nice & clean with showers, laundry and a playground, but no fires were allowed, so that was a bummer for our family. We did spend time washing laundry and taking showers before going to sleep that night.

The next morning we were up & ready to see more of Yellowstone. Since Yellowstone & Grand Tetons were big parks, we knew we’d want to stay 2 nights at each one and I’m glad we did. Yes, we could’ve stayed longer at every place we went, but we were trying to visit as many places as we could and never felt like we missed out on seeing anything or felt rushed. On the second day there, we stopped at the Grand Canyon of Yellowstone (both upper & lower falls) where we took tons of pictures and were in awe. Next we drove around for awhile and went to Mammoth Hot Springs & Steamboat Geyser with lots of stops along the way. There is one section of the park that we read was not really safe for RVs to go, so we didn’t get to see one section of the park. (The main road thru the park is shaped like a figure 8. The part that is supposed to be dangerous for RVs is located on the top, right side of the 8). We knew we had another long day of driving ahead of us the next day, so we turned in early for the night.
Entrance Fee for Yellowstone NP: Free with our pass.
Cost of Campground Reservation: $190.09 for 2 nights in a pull-thru with full hookups.
Day 12: Driving to South Dakota
Day 12 was spent making the long drive toward South Dakota. It took us about 10 hours driving straight thru (my hubby was a pro driver by this point, ha!). We stopped in Custer, SD for dinner before finding a campground nearby. We got in late, but stayed at Heritage Village Campground, which had a great view of the Crazy Horse Memorial all lit up.
Cost of Campground Reservation: $31.80 for 1 night in a pull-in site with full hookups.
Day 13: CRAZY HORSE MEMORIAL, MOUNT RUSHMORE & BADLANDS NATIONAL PARK, South Dakota
This day would be our final day of sightseeing and we had a lot we wanted to do. Our first stop was the Crazy Horse Memorial. We arrived shortly after they opened and looked around the museum, watched a movie about the memorial and took a narrated shuttle ride to the base of the memorial. The shuttle driver was very informative and it was neat to get a little bit of a closer perspective of the memorial. We really enjoyed it.
Next up was Mount Rushmore, just a short drive away. There we checked out the visitor’s center, walked along the presidents trail and took lots of photos. After spending a couple of hours there, our next destination was Badlands National Park. We had to stop at the infamous Wall Drug store on the way and see what all the fuss was about (there are tons of billboards advertising Wall Drug along the way). We checked out all of the kitschy souvenirs and grabbed milk shakes, donuts & free water before finishing our drive to the Badlands.
Once we arrived at the Badlands, we drove the loop drive beginning at Pinnacles Entrance. We didn’t really know what to expect at this park and I will say, for us, it was a bit underwhelming after going to such magnificent parks earlier in our trip. It was still very interesting to drive thru, but we didn’t see much to do here. After a short stop at the visitor’s center to stamp our passport books, we were on our way again to begin our trek back to Colorado to return the RV. The Badlands felt very remote. We traveled a long way before ever seeing another car! We didn’t have a campground reservation for this night, but ended up stopping in Cheyenne, Wyoming at the A.B. Camping RV Park for the night.
The next morning, we drove the rest of the way to return our RV, which was due before 10:30am. We had originally talked about maybe returning the RV and staying a night in Estes Park in the Rocky Mountains, however we were all kind of ready to get home. We ended up driving straight thru and arrived home around 2am!


Entrance Fee for Crazy Horse Memorial: $30
Shuttle Bus to Base of Crazy Horse Memorial: $20 for all 5 of us.
Entrance Fee for Mount Rushmore: $10 (you cannot use the NP pass here).
Entrance Fee for Badlands NP: Free with our NP Pass.
Cost of Campground Reservation: $46 for 1 night with full hookups.
HERE IS A BREAKDOWN OF OUR EXPENSES FOR THE TRIP…
RV Rental for 13 days, plus additional miles: $3160
Campground Reservations for 13 nights: $762
Gas + Propane Refill (including gas in our personal car, driving to/from Colorado): $1402
Entrance Fees + Tours: $382
Annual National Park Pass: $85 (without this pass, we would’ve had to pay $275 to enter all of the parks we did!)
TOTAL SPENT, NOT INCLUDING FOOD, NECESSITIES OR SOUVENIRS: $5791


MY FINAL THOUGHTS…
This trip was everything I dreamed it would be and more! Sure, it was stressful at times, but the quality time we all had together, experiencing new places as a family was amazing! We made so many memories from this trip and we were all able to get up close & personal with things and places we had only seen in books or on TV. Watching our kids pass the time playing cards together while we drove or play together at the campground or take their own pictures of things they thought were neat or even how everyone worked together to set up or take down each time we moved to a different location was incredible for me to watch, as a mother. I can’t recommend a trip like this to families enough and I’m so thankful we were able to make it happen!

Is there anything I would do differently? Not really. Obviously if we would’ve had more time, that would have been great, but I’m really proud of how much we got to experience in 2 weeks. There are so many places out west that we would still like to see, but we’ll save those for next time. The only other thing I can thing of is that I was wanting to go on this trip at the end of spring to try to beat the summer heat, but it was unseasonably cool in many places we went (even some snow!) so I wish the weather would’ve been a bit warmer. Maybe trying it in beginning to mid-June would have been better, but weather is very unpredictable.
Are there any ways to save some more money doing this type of trip? We chose to stay in actual campgrounds every night, however there are lots of options for free camping (aka boondocking) in state parks or even some Walmart parking lots. You could also save money by renting a smaller motorhome, using one you already have or borrowing one. We decided that the expense of renting a larger RV would be worth it so that we could each have a little bit more room. We ate most of our meals in the RV, stopping at WalMarts along the way to get groceries, however we did eat out a few times just as we would if we were at home.
I hope this blog post is helpful and that you’re inspired to take a trip like this yourself. I know it’s lengthy… I tried to keep it as short as I could, but if you have any questions, I’d be happy to try to answer them. Safe travels!